Image

Image

Saturday, October 27, 2012

A quilt for my brother

I have 2 wonderful brothers. I love them them both. My brother Aaron has had a love affair with hockey from the time he was a little kid. We lived in a heritage home where the basement wasn't finished. So this was a perfect place for Aaron to practise his shots. He spent hours down there picking the perfect spot for his next game winner. I'm sure my parents were the only ones who ever had puck marks all over their furnace.


Aaron played for a lot of teams. And I think he could have made it to the NHL. He was and still is an awesome player. To this day, he still plays hockey throughout the winter and he makes a home ice rink for his kids. But I think he likes it best!

 I wanted to make a quilt for him that depicted his love of hockey. He is almost 50 years old and still has a lot of his jerseys.  So one day I asked his if I could have them.  He reluctantly handed me a garbage bag full of his jerseys. He also included a few softball jerseys just in case I didn't have enough. He said take good care of them.  I told him I would make him something special out of them.

Well my way of taking care of them was to cut them apart. As I did so, I was so worried that my brother would be in tears if he saw what I was doing.  I carefully fused each jersey front and back to a fusible interfacing then cut out quilt squares. Some of the jerseys were not in great shape so some I mended and some I used only the best parts. Then I added a border to each block and some sashing   I finished the quilt off with a wide border. On this border (with the help of my Accuquilt studio) I added his name and the words "He shoots, He Scores" and some maple leaves . The quilt is now waiting its turn to be quilted.

My brother and his family were out at Thanksgiving. Aaron has been dying to see what I have been up to. I didn't want to show it to him until it was completed but he caught me at a weak moment and I gave in. I took him in to my quilting studio and opened up the completed top. My brother doesn't get choked up very easily but he got tears and gave me the biggest hug ever. He can hard wait to take it home and to show his hockey buddies what his big sister made him

Here are a few pictures. The quilt is quite large and I don't have a place large enough to lay it flat for photographing so I can only show parts of it.


Tuesday, August 7, 2012

Like many of you, I enjoy my summer vacation. My husband and I usually take the opportunity to do some camping, swimming and hiking. (He does the hiking and I do the swimming.) I also love to take my sewing machine along to do some quilting. A few years ago my brother gave me an old generator that would run my machine and I was hooked. I open the awning on the trailer and set up one of those fold up tables. On goes my cutting matt and sewing machine and away I go. It is so fun to sew outdoors in the fresh air! If you have never tried it, add it to your to do list.You will love it!  


When I get hot, I go for a dip in the lake or creek we are camping near. Or, I will spend a little time fishing. I never catch anything but I don't try very hard because if I ever caught something, I'd have to clean it.

This is one of my favorite places to camp. Lots of childhood memories here.


This year, I brought one of my UFO's. I'm happy to say that it is almost finished. I just need to add the outside border and I am done. I didn't think I'd get this far so I didn't bring the border fabric with me. The quilt is out of the book " Slice 'Em & Dice 'Em" Quilts by Nancy Brenan Daniel. The pattern is called "Scrap Bag Shadow Boxes". To make this quilt, you make blocks in pairs. You started out with two different Nine Patch blocks that you slice a couple of times in each direction. Then you take out the middles and trade it with the other block and then sewed then back together. The blocks you get look a lot more complicated than they really are. This quilt has been hanging around for a long time so I'm glad to be almost done.


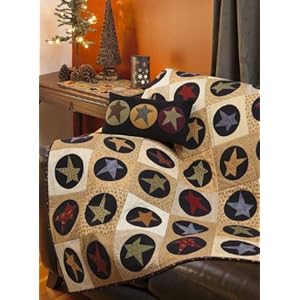
I also worked on a new quilt I kind of designed. I say kind of because I really started out making a quilt called " Winter Cottage" from the book " 'Tis the Season" by Jeanne Large and Shelley Wicks. It is my favorite book. That quilt had light colored 8 inch blocks with a black appliqued flannel circle on it and then an appliqued star. I exchanged the star for a maple leaf for a more Canadian looking quilt. My Quild Guild has a challenge this year to make a stash quilt. So this is my stash quilt. I used many different beiges from my stash for my background and I used black flannel for my circle and scraps for my maple leaves. I didn't purchase a thing. I think of it as a free quilt! I'm not going to make this into a huge quilt. I think it will be a nice size to cozy up on the couch with. I used my Accuquilt Studio to cut out all my shapes. It took no time at all.

This is  the quilt from the book.


Tis the Season: Quilts and Other Comforts (That Patchwork Place)

Here is a few of my blocks.


Tuesday, May 29, 2012

I thought you might like some inspiration! Here are a few quilts I saw at the Salt Lake Quilt Show.

This is the maker of the Best of Show!  You might recognize the quilt. It is on the cover of June/July Quilters Newsletter magazine. The quilt is called "America Let It Shine" and the  makers name is Sherry Reynolds. Check out Quilters Newsletter to read the article and see her amazing piecing and quilting. And it was done on her home sewing machine!


This quilt was on the brochures etc for HMQS. The theme was "Star Spangled".

This Amish syle quilt had beautiful quilting.


Ever wondered what else you could do with quilts? This vender made the most beautiful footstools from them.


This quilt of Jack Nicolson was so real looking.  The maker must have been a real fan!


Couldn't you fall in love with this little girl?


Sunflowers make me happy! These ones are beautiful.


Many people start these quilts but many don't ever finish. This one is spectacular!


Scrap quilts are my favorite . This one was really nice.


Wednesday, May 16, 2012

HMQS 2012

I love to learn new things. Each year I treat myself to a week of learning at one of the many Quilting Conferences held throughout the USA. I have been to Innovations in Tacoma Washington, to MQX in New Hampshire and HMQS in Salt Lake City.  Each of the conferences have a quilt show, classes with amazing instructors and of course merchants.  Lots and lots of merchants! The Conference in Salt Lake City is my favorite. This was my 5th year attending that show.

I look forward to this week for the whole year! This year I was able to take classes with Dusty Farrell. Cathy Franks, Carmen Geddes, Bobbie Bergquist, Sally Terry, Jennifer Alexander, Renae Haddadin, Judy Woodworth and Sue Patten.

Each instructor is a amazing at what they do. Sometimes I take classes to learn a new skill. Sometimes I take them for inspiration or to learn something I've never tried.  I thought you might enjoy a few picture of these talented instructors work.

Cathy Franks is an international award winning  quilt artist. Here is an example of her work.

1250_img_0949.jpg

Dusty Farrell's  White Tail Deer quilt has won many award.  He is well know for his Quilting in the Dark Class. Check out this class on utube. It is free motion longarm quilting in the dark using ultraviolet light and uv reactive threads. I took his Echo Puzzle class.


Renae Haddadin's quilts are amazing! She is well know for her amazing rays.


Sue Patten is a Canadian quilter we can be very proud of . Her quilts are are the best use of thread I have ever seen. Sue uses verigated threads and counts the stitches to achieve the colors you see in her quilts.


I'll share more another day!

Saturday, February 25, 2012

One of my other interests

Like all of you, I do have interests other than quilting. One of my favorites is bread making.  I really like the taste of those heavier European type breads. But I haven't been very successful at making them. I keep trying to replicate the dark round loves my Grandmother used to make when I was a child. I'm not sure what they were made of. It could of been Rye which was popular in her Norwegian homeland but I am just not sure. Grandma died when I was a teenager and I never got a recipe for this bread. (If she even used a recipe.)

I started out many years ago making plain old white bread, then graduated to grinding my own wheat and making whole wheat bread. Recently I found the most wonderful multigrain mixture that makes a great multigrain loaf. My husband loves bread so I can never have enough of it in the house.

 I have been doing a lot of reading about the benefits of using wild yeast (aka sour dough). It is supposed to be much better for you than the commercial yeast you can buy in the store. I ordered some authentic San Franciso sour dough starter and got myself  the cookbook called  " Classic Sourdoughs" by Ed and Jean Wood.  It took a a week to get my starter built up and active by adding water and flour several times a day.

This week I decided it was time to make my first loaf.   Making sour dough breads aren't a quick process. It takes 2 or 3 days depending on your recipe.  I started on Thurday evening by proofing the starter. Then on Friday morning I added the rest of the ingredients and mixed up the dough. Then I put the dough in a bowl and refridgerated it for 24 hours. This morning I took it out of the fridge and let it rise in a proofing bowl for 5 hours. Then I  baked it on my baking stone this afternoon. It wasn't a hard process but it just took time. I used a recipe I got from the website breadtopia.com. That site has video clips that walked you through each step and I thought that was a good place to start.


 I thought I'd share what it looked like. I was so pleased with the results. It is awsome!


As soon as it cooled a bit, I cut a few slices for my husband and I to try it out. I smothered them with butter and we ate them without anything else on it. The bread was wonderful and had a hint of sour dough tartness. But it wasn't too strong. Now I think I'm ready to try the recipes in this book. I hope they work out as well!


Wednesday, February 1, 2012

MyAccuquilt Studio

I'm so excited! My Accuquilt Studio cutter arrived a few weeks ago and I'm having so much fun using it. If you have never heard of Accuquilt, it is a die cutting system that will allow you to cut up to 10 layers of fabric at once accurately and easily. And there are over 400 different dies you can purchase.


I have been wanting to reduce my fabric scrap pile a bit so I've been taking my smaller pieces of fabric, adding fusible web to them and then cutting hearts for an applique quilt. It is so fun! In what seemed like only moment, I had cut over 75 prefect hearts.

I purchased quite a few different dies for my Accuquilt Studio cutter and I can hardly wait to try them all out.  I won't go into all the dies but here are a few you might be interest in.


 The Bread and Butter Dies allow me to cut out shapes that are most often used in 12 inch quilt blocks. It even has a strip cutter which cuts 5- 2 1/2 inch strips at once.


The Rag to Riches set will allow me to cut Rag quilts with the fringes already cut for you.


The Drunkard's Path set allows me to cut 4 blocks of Drunkard's path at once.


The Rose of Sharon die set was designed by a Canadian by the name of Sharon Pederson.( Some years ago our guild had Sharon in to teach a workshop. She was awsome! ) The Rose of Sharon die cuts five sizes of roses, two leaves and three sizes of circles.


This set is called Take 5. It makes a wonderful quilt similar to the
Turning Twenty quilts that have been popular over the last few years. This die set will allow you to whip up a quilt quickly. It would be perfect for gift giving or a charity quilt.


Sunday, January 29, 2012

Mennonite Girls Can Cook: Homemade Laundry Soap

About a year ago, my friend Stephanie mentioned she had found a recipe on the internet for homemade laundry soap.  We bought the supplies and we have been making our own laundry soap ever since.


The original recipe I tried came from the blog called "Old School Self Reliance 101." This recipe was good but I found one I like better. It came from the  "Mennonite Girls Can Cook" blog.  http://www.mennonitegirlscancook.ca/ 

If you have never tried making your own laundry soap, give it a try. It takes only about 10 minutes and is so easy! And for just a few dollars you will get 5 gallons of liquid laundry soap that can be used in both the regular washing machines and the new more energy effecient ones.

Homemade Laundry Soap


  • 1 sunlight bar grated into a medium saucepan
  • 4 cups hot tap water
  • 1 cup Washing Soda
  • 1/2 cup Borax
  • 1 five gallon pail
  1. Melt the Sunlight bar over medium heat . . stirring the whole time.
  2. Dump it into a 5 gallon pail and add the Washing Soda and the Borax. Stir well.
  3. Add hot water to the pail to come to a few inches to the top of the pail.
  4. Stir well. ( I use a broom handle)
  5. Let sit overnight and give it a good stir. It will jell a bit.
  6. Fill empty laundry soap containers.
  7. For my front load washer I use 1/4 cup.
  8. For top load washers you will use closer to 1/2 cup.
You will need to experiment with your loads. Dirty loads need more detergent than light loads. I use it on my dirtiest farm laundry and on my delicates with equal satisfaction.

One of their readers said they added a half a small bottle of Dawn dish detergent to the recipe to help with grease spots. I did the same. I used the New Zealand Springs scent and it made the detergent smell wonderful.


Monday, January 23, 2012

First of all I'd like to apologize for not updating my blog in a few months. I really didn't think anyone was following it. Well I found out, I was wrong.  Thanks to all who visit it!

I have so many talents clients. They make some wonderful quilt! I thought I would share a few of their projects.

This lovely baby quilt was made by Linda N. for her new grandson. The appliqued pictures are original designs and each has a special meaning to her son.


Donna O. made this beautiful Flower Garden quilt with help from her mother. It contains fabrics she collected as well as fabric from clothing.


Diane B made this quilt called Holiday Flourish. In addition she made 3 more of the same quilt in different colors for her grandchildren.

Diane's sister Helen passed away with some unfinished projects. Diane completed all of them. I'm sure the recipients really appreciate all her hard work. Here is one of the  completed quilts.


Each of us have someone special in our lives that we just have to make a quilt for. This one by Judy D. is one of those quilt.

I love this next quilt made by Gloria. F. I just love the pattern and hope to make one someday. I sure hope mine will look half as good as Gloria's.


Here are a few close ups of Gloria's quilt.


This beauty was made by Karen B,